3. Bulk Actions
Purpose: This is how easy it is to get started. By the end of this tutorial, you should be comfortable creating in bulk. **Note: please refer to the data overview if the following plot is not familiar, its a VERY quick read (< two minute read)
As a refresher,
- there can be a one model to many type of relationship.
- There is one location to one widget
- but you can have one model for multiple locations.
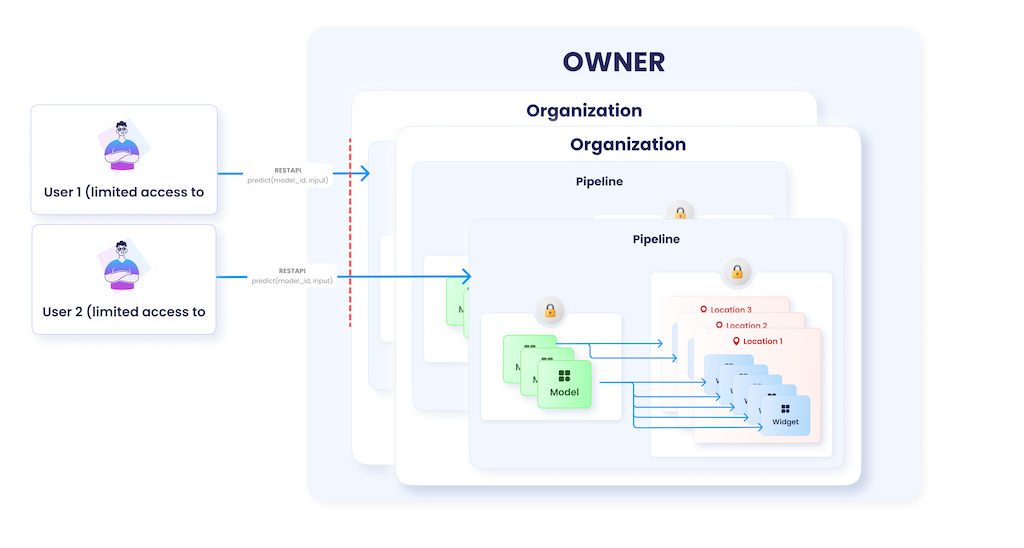
Fig. 1. The Pipeline Heirarchy with Its Multiple Layers of Security.
To create pipelines and bulk, first you create a pipelines configuration file.
3.1. Bulk Create Pipelines
To start, first you need to ask a series of questions. As you answer them, note the answers in the configuration file. See below,
example-pipelines.json
{
    "owner": "billing@example-domain.com",
    "organizations": {
        "Example Org": {
            "pipelines": {
                "Example Pipeline": {
                    "locations": [
                        "Example Location 1"
The following details how to fill in the information.
- Were require at least one user to own the account. So the first question is, who is paying? That will be the owner.
“owner”: “billing@example-domain.com” - Next, the account owner can create one or more organizations to host pipelines. Currently, organizations are isolated entities. <br
“organizations”: {”Example Org 1": ...} - Organizations now need items with objects that users can interact with. You set up this environment using a pipeline.
“pipelines”: {”Example Pipeline 1": ...} - Often you may have a dataset that many would benefit from, but you may have restrictions on which data they can view. (e.g., various banks wherein staff need not access other location data.) You can optionally achieve this restricting by inserting the following.
locations: ["example Location 1", ...] - You can now create the pipelines by running the following script,
organization.bulk_add("pipeline.json”)
Next, you need to add data; see the Pipelines Section.
3.2. Bulk Add Data
After creating a pipeline, you must add the data required to interact.
- You can do that by reusing the previous file to iterate over for adding the data.
data.json
{ "owner": "billing@example-domain.com", "organizations": { "Example Org": { "pipelines": { "Example Pipeline 1": { "Example Location 1": ["data/location1/01-01-2023.csv", data/... - You can now add data to the pipelines by running the following command.
organization.bulk_data(data.json”)
3.3. Bulk Create Widgets/Models
Next, we must create objects for the end users to interact with. Knowing your user’s needs unleashes a lot of opportunities. For example, the product could be widgets in the form of reports or events, such as table count next item predictions.
-
First, you have to think about who the machine learning product users are. Some examples include the following: MGMT: want to track a few heuristics to improve operations. Staff: want to make quicker, more accurate decisions on the floor.
Thus, you might determine that you will create two objects to interact with. Eg. for the managers you will run on a calendar event invoked by a model that aggregates a certain ML models heuristics statistics. Whereas for the staff you will invoke a widget for on device that helps provide recommendations every time a button is clicked.
model.json{ "owner": "billing@example-domain.com", "organizations": { "Example Org": { "pipelines": { "Example Pipeline 1": { "Example Location 1": { "models": { "Example Model 1": { "fromDate": "01-01-2023", "toDate": "06-01-2023" } }, -
Where the model.json excepts the same parameters as the RESTAPI and the UX, like below,
model.json(line 8)
"models": {
        "next-item": {
            params: {
                "timeseries": True,
                "x": {},
                "y": {},
                "pipeline": "2890379nvjs"
                "user_secret": "lkjho823hikuwn"
            }
        }
    }
organization.bulk_data(data.json”) -
After some time for training, say 15 minutes, you can add widgets to those models.
widget.json(line 8)
"widgets": { "Last Week Staffing": { params: { "timeseries": True, "x": {}, "y": {}, "pipeline": "2890379nvjs" "user_secret": "lkjho823hikuwn" } } } -
Calendar events can be scheduled using standard daemons (like cronjobs), which can call API at a particular time to send emails.
    crontab -e
    [RESTAPI CALL GOES HERE]
3.4. Bulk Adding Org. User
- Lastly, you will need to create users to access the objects.
  {
    "owner": "billing@example-domain.com",
    "organizations": {
        "Example Org": {
            "users": {
                "billing@example-domain.com": "FINANCIAL",
                "dev@example-domain.com": "DEVELOPER"
            },
            "pipelines": {
                "Example Pipeline 1": {
                    "locations": {
                        "Example Location 1": {
                            "users": {
                                "billing@example-domain.com": "VIEWER",
Save that output. Now you have everything you need to create cronjob or trigger events in your platform using our corresponding API.